Building a React Native App Without Tears (Mostly)
Sep 16, 2019 19:46
Last year, I worked on a project that we had hoped would just be a mobile-savvy web page, but for various reasons we ended up needing to build native iOS and Android apps. I was still getting the hang of the new Swift tools for iOS, and had never done any Android development before - but I had heard interesting things about React Native, so I figured I would give it a try. While React Native certainly had its headaches, it was still much easier to work with one single codebase in a fairly familiar language rather than having to maintain multiple codebases and learn multiple new languages and development stacks.
Over the last few weeks I worked on a spin-off from last year's project, and it got me a bit deeper into React Native - but I also ended up dealing with a ton of headaches getting things configured and set up properly. For a while I ended up with TWO different React Native projects, one which would build and run properly only in iOS, and another which would build and run properly only in Android. After some headaches writing shell scripts to copy all my application code and resources back and forth, I finally figured out a way to build a React Native app which actually worked on both platforms.
The problem with React Native is that while the core coding experience is quite nice, it's built on top of not one but three rickety towers: the iOS development stack, the Android development stack, and the modern NPM JavaScript stack. This means that while developers on most platforms have to deal with just one constantly-changing, obscure, and occasionally buggy stack, React Native developers have to deal with three of them.
This post is a way of sharing what I learned from my latest React Native adventure. I spent a lot of time poking through Stack Overflow and GitHub issues pages and various blog posts and articles, and ended up chasing a lot of dead-ends. There was also a lot of shouting and swearing. I hope this can spare you some of that.
I want to note that I am definitely not a React Native expert. I just wanted to share my experiences and how I got around some of the gotchas that I faced in this development process. If this series helps anyone, I'll be happy. If it just makes some people laugh, I'm fine with that too.
I was asked to give a presentation at the Halifax JavaScript + Emerging Web meetup, and these blog posts are essentially documentation for that. Funnily enough, even though I had managed to get everything working in preparation earlier in the day, the build process mysteriously broke during the evening presentation, and even a room full of compsci students couldn't figure out why. Such is life in React Native land!
I want to point out though that React Native changes really really quickly - especially considering all the extra libraries and package managers it has to work with, which are all changing all the time. React Native is like a river - you never step in the same thing twice. So these notes are up to date as of mid September 2019. If you're reading this in 2020, then you probably have all sorts of new problems to deal with which I didn't cover here.
GETTING STARTED
Facebook has a nice "Hello World" introductory tutorial that walks you through all the steps for getting a React Native project off the ground. I highly recommend going through that to get started. However, unless you're careful, you're going to end up with an app built in Expo - and surprisingly you won't want to do that. Expo is a wrapper environment for React Native which can output to iOS, Android, and even a cool web-based virtual machine. The idea is to make a single fast-to-start-working environment for React Native, like HyperCard or Ruby on Rails. This is a great idea, and I love both HyperCard and Rails, but the problem with Expo is it adds yet another layer on top of the already teetering Jenga tower of Android, iOS, and JavaScript/NPM code. A lot of the most confounding problems I had simply went away when I skipped the whole Expo thing and worked directly with React Native.
One reason to stick with Expo is if you have trouble installing or running XCode and/or Android Studio. Expo will let you at least build stuff and see what it looks like - but getting a real deployment working at the end of the day will probably be more problematic with Expo (at least it is right now).
So, if you're looking at that Getting Started guide, make sure to click out of the "Expo CLI Quickstart" and go to "React Native CLI Quickstart". For the rest of this, we're going to skip Expo and just work in regular old React Native. You'll thank me later.
Setting up the environment
First things first you'll need to set up your JavaScript environment. The Facebook guide recommends Yarn but I found NPM worked slightly better for me. If you're on a Mac, first install Homebrew. Yes this is a package manager you use to download other package managers which will call other package managers. This isn't a Homebrew tutorial, and I've found that it's not usually a problem to work with.
> /usr/bin/ruby -e "$(curl -fsSL https://raw.githubusercontent.com/Homebrew/install/master/install)"
> brew install Yarn
> brew install node
> brew install watchman
(Watchman is supposed to look for changes in your files and automatically trigger events, but for whatever reason I could never get it to work properly. You can also just reload things manually, which is probably cleaner anyhow.)
> brew tap AdoptOpenJDF/openjdk
> brew cask install adoptopenjdk8
So now you've installed two package managers, a Java runtime, a JavaScript environment, and a utility which probably won't even work anyhow. And we're just getting started!
> npm install -g react-native-cli
This is the command-line tools for React Native. Obviously important. You should already have NPM installed from the earlier steps, but otherwise you might need to do it yourself:
> curl -0 -L https://npmjs.org/install.sh | sudo sh
Then you need to install XCode. This is like a DVD worth of downloads, so go have a snack or something. Don't forget to also go into XCode's preferences and pick Command Line Tools from the "Locations" tab.
Then you need to install Android Studio. This is also multiple gigabytes of downloads. Make sure you've picked "Android SDK", "Android SDK Platform", "Performance (Intel HAXM)", and "Android Virtual Device". On the welcome screen, pick "Configure" and select "SDK Manager". You need to select "Android 9 (Pie)" SDK, but you can also choose a later one too ("Q" is the latest). Make sure you've picked "Android SDK Platform 28" and "Intel x86 Atom_64 System Image". Click "Apply" and go for another snack while it downloads everything.
Next you get to add to your $PATH shell variable. $PATH has traditionally been a big headache for Java development, but these updates seemed to work okay out of the box. Go to your home directory and open .bash_profile or .bashrc and add these somewhere:
export ANDROID_HOME=$HOME/Library/Android/sdk
export PATH=$PATH:$ANDROID_HOME/emulator
export PATH=$PATH:$ANDROID_HOME/tools
export PATH=$PATH:$ANDROID_HOME/tools/bin
export PATH=$PATH:$ANDROID_HOME/platform-tools
If you're not using the Bash shell then you'll need to figure out where your config lives. This is the kind of fiddly details that Expo deals with, which is great - but it adds other problems down the line.
Creating a new application
Okay now we're ready to build our application! In your terminal, go to the directory where you want your project to live, and type:
> react-native init [appname]
Let's give our example app a proper name. Let's say "Picselect" - it'll be a simple app for selecting from a collection of pictures. So in this case let's type:
> react-native init picselect
This will churn for quite some time. It not only sets up a starting React Native app, but it also configures, downloads, and installs lots and lots of JavaScript packages using yarn or npm - and then configures, downloads, and installs lots and lots of iOS packages using CocoaPods (a package manager for XCode, based on Ruby Gems). That's two whole sets of packages, built with two different languages, and which will probably have different version numbers in them when you're reading this than I had writing it.
Running Welcome to React
Now you're ready to run your apps!
The init process should have created a "picselect" directory. It's likely to be more than half a gigabyte in size (!) - so keep that in mind if you're building lots of test projects, since you might start to run low on storage space. Go into that directory and check things out. You'll see a "node_modules" folder - full of all sorts of stuff including virtual machines and various library type things. You'll also see folders for "ios" and "android" - these are standalone apps for each platform. It should be ready for you to take a look.
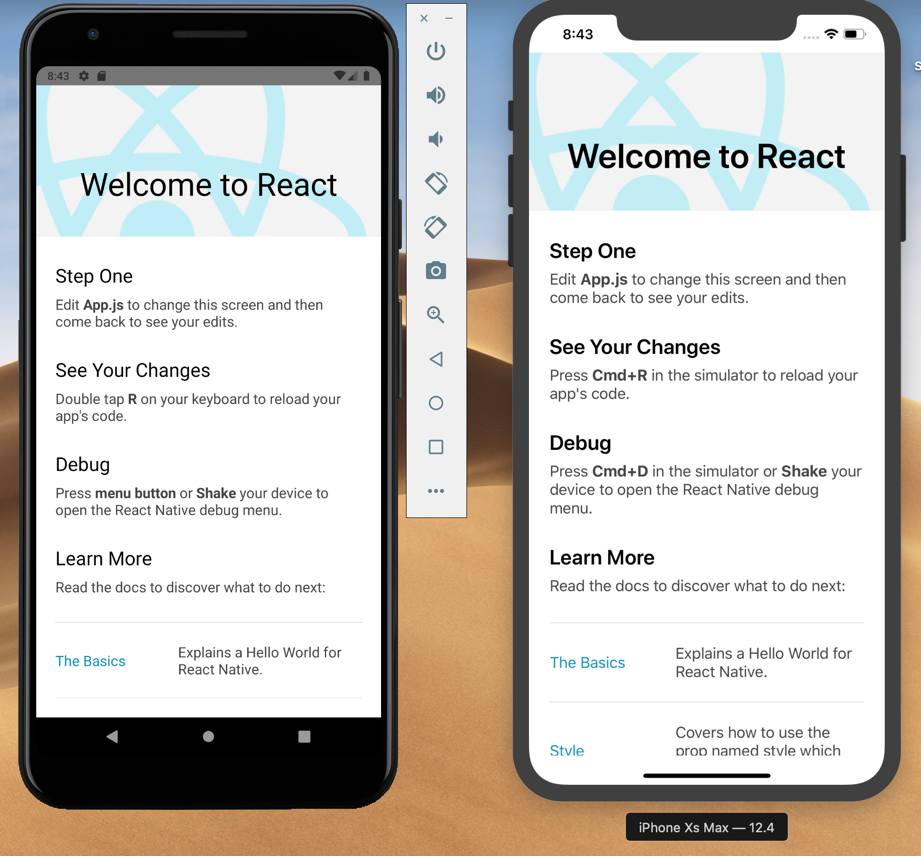
Go into the "ios" folder and double-click on "picselect.xcworkspace" - officially it should be .xcodeproj, but CocoaPods requires opening the workspace instead. From the drop-down menu in the top left of the toolbar, pick an iPhone model and click on the play button to build the project and launch the simulator. This will probably take a little while the first time, so go have another snack. A new terminal window should open up saying "Running Metro Bundler on port 8081." This is your React Native server, which serves up the JavaScript of your project while you're in development mode. Once the simulator is up and running, it will show that it's building your project. If everything works well, once it hits 100% your iOS simulator will show a "Welcome to React" page.
You might notice a bunch of compiler warnings in XCode, as well as warnings and messages about errors and network problems in the simulator's log file. As you get more familiar with React Native, you'll learn to ignore nearly all of these warnings and messages. They are all weird quirks somewhere in the hundreds of megabytes of JavaScript and Objective-C code required to make this mere "Welcome to React" screen appear. I looked for ways to make some of them disappear, but the general response in online forums was "just turn off all warnings" which seemed ... counterproductive.
Now you can run the project in Android too! Unless you have lots of RAM on your computer, you'll probably want to quit the iOS simulator and XCode. If you want to warm up your office, feel free to have both environments and simulators up and running.
Open up Android Studio, and just like in XCode you don't want to open the project the obvious way: don't pick "Open an existing Android Studio project", instead, pick "Import project (Gradle, Eclipse ADT, etc.)" and then select the "android" directory in your app. This does some extra cleanup and reconfiguring things and cuts down on some potential problems.
Android Studio will churn for a while building the project from its "Gradle" build configuration. There's a menu in the top toolbar for picking a simulator to run. If you don't have one yet, you can select "Open AVD Manager" and pick "+ Create Virtual Device" to set up a new simulator device. Pick a recent phone. I have a "Pixel 3a XL API 28" as my main device. It will then download about a gigabyte of simulator files but after that you'll be ready. Once you're back on the main screen, make sure your AVD has been selected in the menu and then click on the green triangle to run the app in the simulator. This will take a while, so go get another snack.
You might get a message on the simulator saying something like "Unable to load script. Make sure you're running a Metro server" - this might happen if you closed the terminal window that came up when running the iOS simulator, or if you've simply started with Android Studio first. XCode will automatically launch the server, but Android Studio won't. Open a terminal window, go to the project directory, and type
> react-native start
This fires up the code server. If you want to see something fun and/or terrifying, poke around the Android Studio interface until you find the "Logcat" viewer, and watch all the error messages roll by. After your iOS experience, you should be able to just take this in stride, like it's a green-screen from the Matrix.
You might get a message that Android Studio would like to upgrade your Gradle plugin. I don't tend to do this, at least in the middle of a project, since even a small point difference in any dependency can cause errors that bring the whole project down.
The Metro Bundler terminal window will show the project JS being built and bundled and sent over to the simulator environment. If everything goes well, you should see the "Welcome to React" screen like you had on iOS. One JS page, two native apps in two totally different environments. Pretty cool eh?
NOW SAVE EVERYTHING SO YOU CAN GET BACK HERE
If you got this far without any crashes or configuration explosions, congratulations! You now have a React Native app running in both Android and iOS.
Now that it's working you need to get a snapshot of all this so you can return to this state any time. For this you'll probably want to use git. You may already have git installed. If not, follow the instructions here. If you're doing any coding at all, git is a super useful tool - it's like a time machine for your code.
Anyhow, back on the command line in the root directory of your project, type:
> git init
React Native helpfully comes with a properly configured .gitignore file, which means it won't be tracking all of your temp and build files or your massive node_modules folder. Type:
> git add .
> git commit -m "Starting version that works"
Taking a snapshot in your version control every time you have something running properly is a valuable practice in React Native development. It's common to have some small configuration change bring everything to its knees, and it's easier to simply roll back to a version that you know worked than to hunt down whatever caused the problem.
Now you should hopefully have an app that works and a way to get back to that state through version control. Next we'll make some more important adjustments and actually start writing some code.