Building a React Native App Without Tears - Part 2
Sep 17, 2019 18:08
In part one of this series we built a React Native app from scratch and got the built-in demo page to show up properly on both iOS and Android. Next up we'll do some important updates and changes to the project to get it ready for actually coding.
Getting the App Identifier Right
Mobile apps have a unique identifier - often inspired by the package naming tradition in Java of "reverse-domain" naming. Just like how a domain name for an app might be "picselect.shindigital.com", a comparable app id might be "com.shindigital.picselect". This id is used in various places in the iOS and Android versions of the app, and it needs to be set up before we do too much else.
In XCode, click on the project name in the left sidebar (with the blue icon) and you should see a form for your ".xcodeproj" with at the top "Display Name" and "Bundle Identifier", which React Native has pre-filled to: "org.reactjs.native.example.picselect". You'll want to change this to a unique identifier, such as "com.[yourorganization].picselect". Feel free to give it a nicer display name as well.
The Android version has a trickier situation. The default name given to the Android project is "com.picselect", and not only is that in several different configuration files, but it's also been baked into the folders hierarchy. If you look in your app's "android" folder and then dig down into "app/src/main/java", you'll see a "com" folder, and if you open that you'll see a "picselect" one too. You'll want to change all the references to "com.picselect" to "com.[yourorganization].picselect" and also put another folder level in between "com" and "picselect" with the matching new name.
Here's where you'll probably want to fire up a decent text editor like VIM, EMACS, Sublime Text, Atom, or Visual Studio Code. Yes we already have not one but two full IDEs up and running, but they're both set up for their specific environments and languages, and don't handle raw JavaScript super well. A dedicated text editor will often make things easier to work with anyhow.
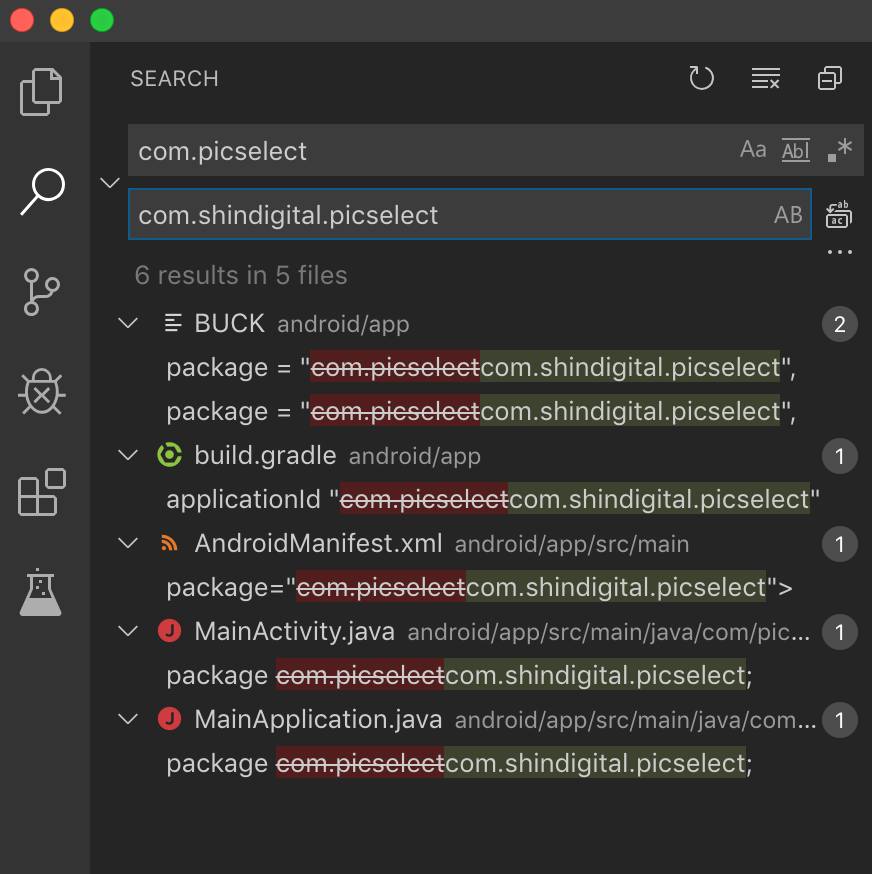
So open the root level of the project in your editor of choice and do a search for "com.picselect". You'll see references to a BUCK file, build.gradle, AndroidManifext.xml, and two Java files. Make sure all those files have had their references to "com.picselect" changed to "com.[yourorganization].picselect"
THEN go down to android/app/src/main/java/com and make a new folder called "[yourorganization]", and move the "picselect" folder into that folder.
Now you want to try running your application again in both XCode and Android Studio. In both cases, it will likely make new versions of the apps in your simulators, since you've now changed the unique app identifier. You can delete the ones you're not using. I find it useful to occasionally just delete all versions of the app every so often, to ensure things stay fresh.
Once you've ascertained that everything is still working commit the latest changes to Git so you can go back to this working state. Likewise, if you had trouble getting this set of changes working properly, you can revert back to the previous Git commit where you knew that things were already working. Git turns out to be essential for this kind of work - and we haven't even written any code yet!
(Note: this is the point during my live presentation that the Android version of the app stopped working. Some part of Android Studio somewhere couldn't find one of the renamed components. We tried all sorts of things but eventually just reverted to the last git commit and moved on to actual coding. Everyone at least learned a valuable lesson about using git regularly!)
Install Some Modules
React Native comes with a lot of functionality built in, but there are many tools, libraries, layout frameworks, adaptors, and more available for it. Thankfully, these are generally all available with the NPM or Yarn package managers that you've already been working with. This makes them relatively easy to install. For example, we're going to be using React-Redux for our app, which we can install like this:
> npm install redux
> npm install react-redux
These install libraries into your already massive "node_modules" folder. I've found it often helps keep things clean to every so often reset your node_modules. In my first round of React Native development last year, resetting node_modules seemed to magically solve about half the problems I was having. This can be done easily any time with these commands:
> rm -rf node_modules/
> npm install
If you're using libraries that interact with lower-level systems in the host mobile systems, like react-native-sound, you will need to "link" them, which updates the android and ios projects and points them to appropriate files inside these module directories. For example, to install react-native-sound, you'd need to do both of these:
> npm install react-native-sound
> react-native link react-native-sound
(Note: we're not using this library for this project so you don't need to install it - this is just an example)
You might get a message saying that you don't need to do this because React Native now supports "auto-linking" but that depends on the library, and I've found it usually isn't implemented yet. It doesn't hurt to do it anyhow.
Once you get all your libraries installed, try running the project in iOS and Android again. You might get errors at this point. Here are a few things that can help:
- go to the terminal that's runnign the react-native server and CTRL-C to kill it and then start it again.
- reset your node_modules/ folder (see above)
- in Android Studio, under the "Build" menu, chose "Clean Project" and "Rebuild Project"
- in XCode, under the "Product" menu, chose "Clean Build Folder" and then "Build"
- Restart the simulators.
- Delete the app in the simulators and re-run it from scratch
- go into the ios/ folder update your CocoaPods with: > pod install
You should still be getting the welcome screen in both the iOS and Android simulators. If so, pat yourself on the back and commit all your changes to git.
Expo
Almost all of this messy stuff might have been avoided if you decided to use Expo, since it has wrappers around a lot of this troublesome fiddly stuff. However, I found that if you start in the Expo ecosystem and then try to get out of it, things fall apart quickly and you can get stuck for days hunting down obscure error messages which have no answers on StackOverflow. Your mileage may vary, though.
Next Up
Now that things are set up, we'll be ready to start writing some code! Stay tuned.